Photo Documentary

photojournalism: a branch of journalism characterized by the use of images to tell a story

Photojournalism tells a story using photographs

NPPA: a professional society that promotes the highest standards in visual journalism

NPPA Code of Ethics:

  • Be accurate and comprehensive in the representation of subjects.
  • Resist being manipulated by staged photo opportunities.
  • Be complete and provide context when photographing or recording subjects. Avoid stereotyping individuals and groups. Recognize and work to avoid presenting one’s own biases in the work.
  • Treat all subjects with respect and dignity. Give special consideration to vulnerable subjects and compassion to victims of crime or tragedy. Intrude on private moments of grief only when the public has an overriding and justifiable need to see.
  • While photographing subjects do not intentionally contribute to, alter, or seek to alter or influence events.
  • Editing should maintain the integrity of the photographic images’ content and context. Do not manipulate images or add or alter sound in any way that can mislead viewers or misrepresent subjects.
  • Do not pay sources or subjects or reward them materially for information or participation.
  • Do not accept gifts, favors, or compensation from those who might seek to influence coverage.

poto

This picture shows a black kid with his hood on holding skittles in his hand . He is portraying the death of Travon Martin.


Abstract Photography

It is a photography that does not represent the subject in a literal way

Abstract photography can produce very dramatic images. It relies on our more primal sense of form, color, and curves than it does on detail.  It takes a different way of looking at our world to perceive the abstract
photography opportunities that surround us.
OLYMPUS DIGITAL CAMERA  OLYMPUS DIGITAL CAMERA   OLYMPUS DIGITAL CAMERA  OLYMPUS DIGITAL CAMERA  OLYMPUS DIGITAL CAMERA  OLYMPUS DIGITAL CAMERA   OLYMPUS DIGITAL CAMERA  OLYMPUS DIGITAL CAMERA  OLYMPUS DIGITAL CAMERA  OLYMPUS DIGITAL CAMERA

Pop Art Research Blog

The original image. Image licensed by Photoshop Essentials.com from iStockphoto.

And here’s the pop art effect we’re aiming for:

Photoshop pop art effect. Image © 2008 Photoshop Essentials.com


Step 1: Draw A Selection Around The Main Subject Of Your Photo


Drawing a selection with the Lasso Tool in Photoshop. Image ©2008 Photoshop Essentials.com

Step 2: Copy The Main Subject Onto A New Layer

:

Photoshop's New Layer dialog box. Image © 2008 Photoshop Essentials.com

The Layers panel in Photoshop. Image © 2008 Photoshop Essentials.com

Step 3: Add A Solid Color Fill Layer Below The New Layer


The New Fill or Adjustment Layer icon in the Layers panel in Photoshop. Image © 2008 Photoshop Essentials.com

Click the New Fill Or Adjustment Layer icon at the bottom of the Layers palette.


Selecting a Solid Color fill layer in Photoshop. Image © 2008 Photoshop Essentials.com

This brings up Photoshop’s Color Picker. Go ahead and choose any color you want right now for the background. It doesn’t matter which color you pick because, as we’ll see later, you can always go back and choose a different color any time you want. I’m going to choose a light blue for now:

The Color Picker in Photoshop. Image © 2008 Photoshop Essentials.com


The main subject on a solid colored background. Image © 2008 Photoshop Essentials.com

And I can now see in my Layers palette that I have a solid color fill layer between my Background layer and the “threshold” layer:

A solid color fill layer appears in the Layers palette in Photoshop. Image © 2008 Photoshop Essentials.com

Step 4: Use The Threshold Adjustment To Remove The Detail From The Main Subject


Photoshop's Threshold dialog box. Image © 2008 Photoshop Essentials.com

Photoshop’s “Threshold” dialog box.


The image after applying the Threshold adjustment. Image © 2008 Photoshop Essentials.com

Step 5: Select The First Area Of Your Subject To Colorize And Copy It To Its Own Layer


Dragging a selection around the girl's hair. Image © 2008 Photoshop Essentials.com

Selecting the girl’s hair with the Lasso tool.


Photoshop's New Layer dialog box. Image © 2008 Photoshop Essentials.com

Give your new layer a descriptive name.


The hair layer now on its own layer. Image © 2008 Photoshop Essentials.com

The girl’s hair is now copied onto its own layer above the “threshold” layer.

Step 6: Continue Selecting All Areas And Copying Them To New Layers


All areas selected and copied to their own layer in the Layers palette. Image © 2008 Photoshop Essentials.com

Continue selecting each area you want to colorize and copying it to its own layer until you’re done.

Step 7: Colorize Your First Section With A Solid Color Fill Layer


Clicking the New Fill or Adjustment Layer icon. Image © 2008 Photoshop Essentials.com

Hold down “Alt” (Win) / “Option” (Mac) and click the “New Fill Or Adjustment Layer” icon.

Then, while still holding Alt/Option, select Solid Color from the top of the list:

Select Solid Color. Image © 2008 Photoshop Essentials.com

While still holding Alt/Option, select “Solid Color” from the top of the list.


Also, make sure you select the Use Previous Layer To Create Clipping Mask option this time:

Choose the Use Previous Layer To Create Clipping Mask option. Image © 2008 Photoshop Essentials.com

The new hair color solid color fill layer added. Image © 2008 Photoshop Essentials.com

The solid color fill layer now added above the “hair” layer.


The hair is now filled with orange. Image © 2008 Photoshop Essentials.com

The girl’s hair is now filled with orange.

Step 8: Change The Blend Mode Of The Solid Color Fill Layer To Multiply


Change the fill color's blend mode to Multiply. Image © 2008 Photoshop Essentials.com

Change the blend mode of the fill color layer from “Normal” to “Multply”.

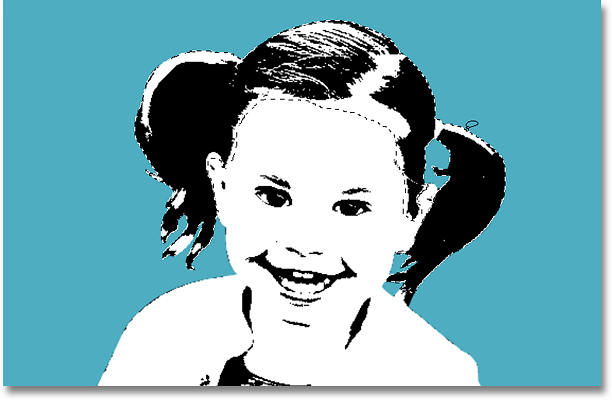
Now the black areas in her hair are visible once again:

The black areas in the hair are again visible. Image © 2008 Photoshop Essentials.com

Step 9: Continue Adding Solid Color Fill Layers For Each Section


Photoshop pop art effect. Image © 2008 Photoshop Essentials.com

The image after adding a solid color fill layer to each section.

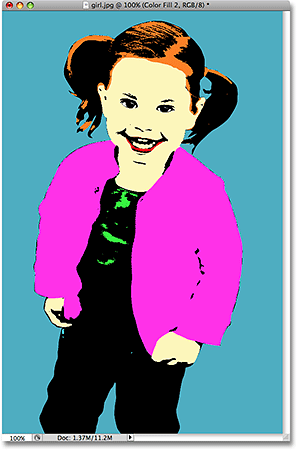
The pop art effect is now complete, and the nice thing is, I can now go back and change any colors I want, as we’ll see next.

Step 10: Change Any Colors You Want Whenever You Want


Double-click on the color swatch of the fill layer you want to change. Image © 2008 Photoshop Essentials.com

To change any of the colors, double-click on the color swatch icon for the fill color layer you want to change.

This will bring the Color Picker back up. Choose a different color, and then click OK. You can change any or all of the colors in the image whenever you want. I’ll go ahead and change all of the colors in my image.

Photoshop pop art effect with different colors. Image © 2008 Photoshop Essentials.com

The same effect using different colors.

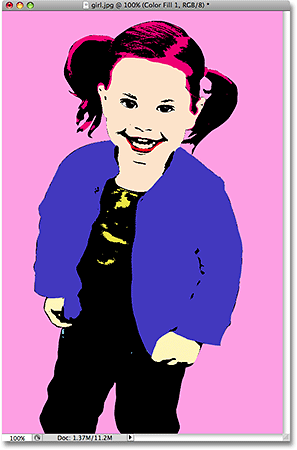
And again, here’s the same image with different colors:

Photoshop pop art style. Image © 2008 Photoshop Essentials.com